
Start your journey now!
✅ Learn Marketing & Systems — ✅ Add additional Income — ✅ Free Travel International & Local
✅ Learn social media content creation — ✅ Access to Video Editors — ✅ Access to Graphic Designers
✅ Learn Marketing & Systems
✅ Add additional Income
✅ Free Travel International & Local
✅ Learn social media content creation
✅ Access to Video Editors
✅ Access to Graphic Designers
Step 1: Create a NEW Gmail Account
Creating a new Gmail account will help you manage your business. Separate your personal emails and transactions. You can do this immediately.
Watch the AXA Gmail guide
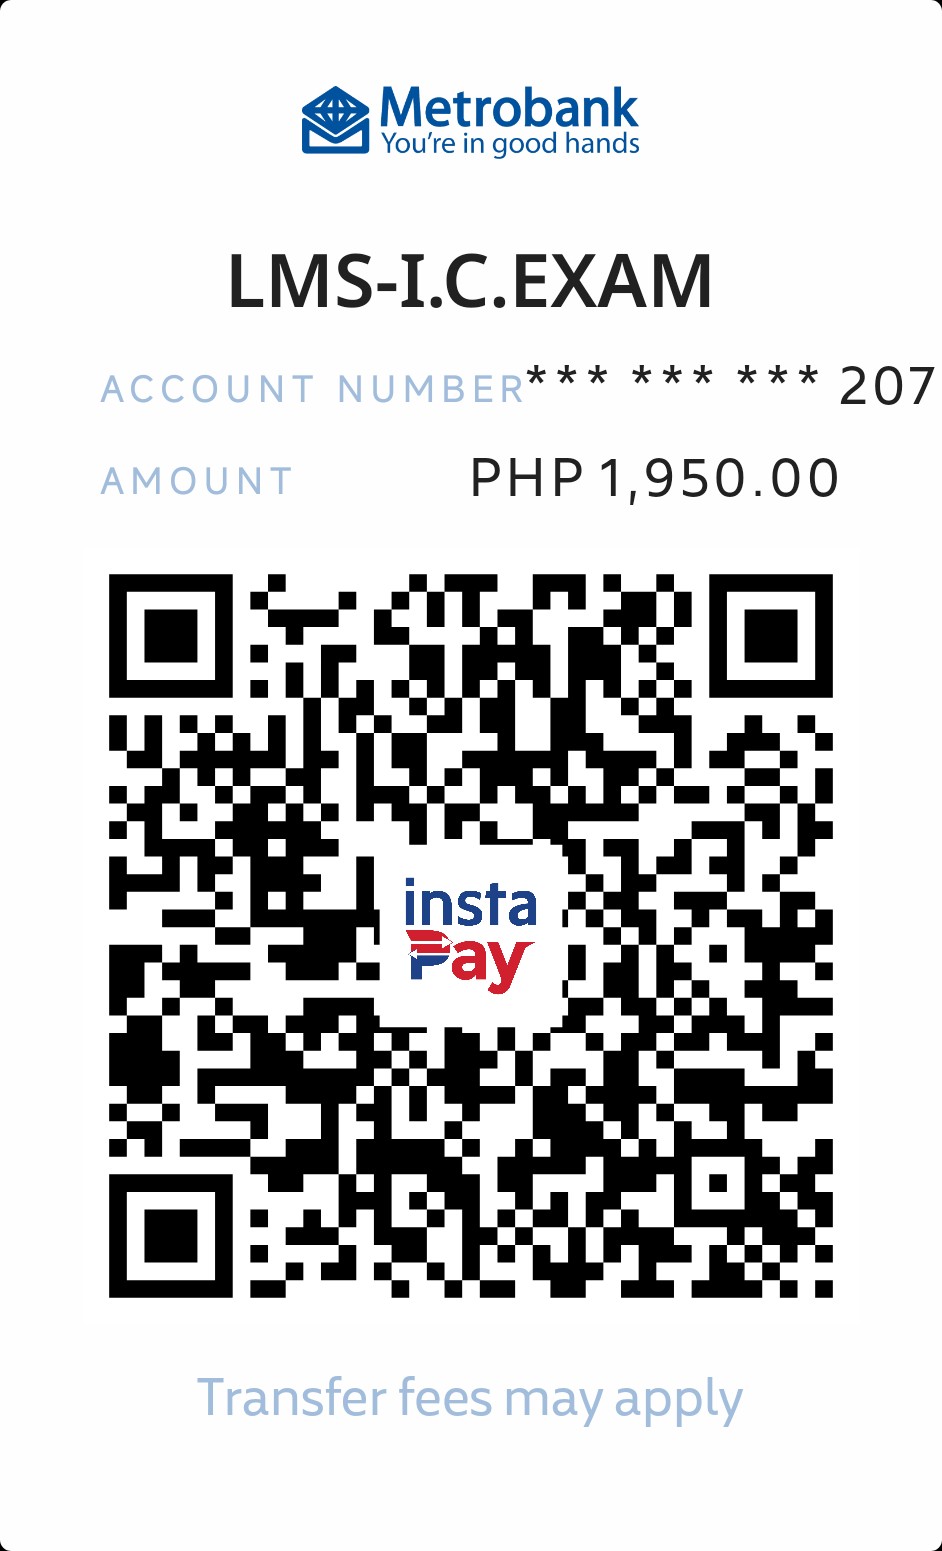
Step 2-A: Pay LMS (P650) and Insurance Commission Exam (P1,300)
AXA University or LMS. Also known as Learning Management System is where you're able to access all the educational materials, trainings, compliance, and more. You will also have access to our review schedules for your insurance commission exam.
Note: These fees are non-refundable.
How to pay LMS and Insurance Commission Exam?
Easy Payment Steps:
1. Scan the QR code using your bank app to pay via Metrobank.
2. Take a screenshot of your receipt or note the reference number.
3. Upload it below to notify us.
4. We'll confirm your payment by responding with reference numbers in your email so you can move to Step 2-B.
Step 2-B: Create your LMS account
Click or Tap here: Create LMS account
IMPORTANT REMINDERS:
1) If you're an existing/come-backing AXA Advisor, please send your reactivation request in MABI > AXA Angel > My Training > Account Reactivation.
2) Registered personal email address must be unique and active. Multiple user with one email address is not allowed. Duplicate email/users will be deleted in system including the training records of the user so please be vigilant and extra careful on uploading information.
3) Email address registered in LMS must be the same personal email address uploaded in the eLicensing link.
4) Payment receipt must be assigned to one advisor per transaction. LMS fee is not transferrable to anyone. Usage of receipt to multiple advisors is not allowed.
5) LMS Payment will be forfeited after 1 year form payment date for non-coded agents.
6) Kindly review and verify below submitted information if all are correct. Always keep the original copy of the payment slip with you for elicensing requirements.
7) For Fast & Furious 2.0 attendees, we need the Actual IIAP/IC exam result to process your request. Please check with Zone ADM for the Fast & Furious coding and LMS guidelines.
8) For entry correction/updating, please email [email protected] and [email protected] for assistance.
Step 3: Comply all other Documents by uploading to upload portal
1.) Signed Advisor's Contract (print and sign then take a photo or camscanner)
- Step-1: Download the advisor's contract and print it.
- Step-2: Scan or take photos of the document and return it by merging all documents into 1 .pdf file.
- Step-3: Watch video on how to properly sign the advisor's contract:
Watch Video Guide - Download Advisor's contract:
Download Contract
2.) Valid ID (take a photo or camscanner app)
- Passport
- Driver's license
- Professional Regulatory Commission (PRC) ID
- Firearm's license
- Immigration I-Card
- SSS Card
- GSIS e-Card
- New Voter's ID
- Tax Identification Number
- OFW ID
- Philhealth card
- OWWA ID
- Seaman's Book
- NBI Clearance
- Police Clearance
- Photo-bearing Barangay ID/Clearance
- Senior Citizen's Card
- Government office and GOCC ID (e.g. AFP, HDMF, DepEd)
- Alien Certification of Registration (ACR)/ Immigrant Certificate of Registration (ICR)
- Photo-bearing National Council for the Welfare of Disabled persons ID/Certification (NCWDP)
- Photo-bearing DSWD ID/Certification
- Integrated Bar of the Philippines (IBP) ID
- Photo-bearing Credit Card
- Photo-bearing HMO Card
- Postal ID
3.) Corporate Photo (take a photo or camscanner app)
Below are sample photo requirement for reference:


4.) Clear copy of TIN ID or proof of TIN Account (take a photo or camscanner app)
- If you already have a TIN, visit https://revie.bir.gov.ph/tin-validation to validate it.
- Complete the validation process and take a screenshot of the validation confirmation.
- Submit the screenshot as required.
If you don't have a TIN, you can create one online via orus.bir.gov.ph or visit your nearest BIR office. Follow these steps to apply online:
- Go to orus.bir.gov.ph, tap "New Registration," and choose "As an Individual."
- Under the list of TIN application requirements, click "Create an Account" at the bottom.
- Select "Taxpayer" and tap "Without Existing TIN."
- A pop-up will appear, reminding you that having two TINs is criminally liable. Click "I Agree."
- In the "User Type-Transaction" dropdown menu, choose "Get TIN for Filipino Citizen-E.O. 98/One Time Taxpayer."
- Fill out the form and click "Register" once done. Provide an active email address, as it will be your login credential for all BIR-related registration and updates. Check your inbox for the ORUS verification email (or your spam folder if not found). Once verified, log in to ORUS using your email and password.
- With your ORUS account, log in and tap "New Registration." Choose "As an Individual."
- Click "Fill Up Registration Form" and enter your information. This section has seven pages; tap "Continue" after each one. You'll need to upload a government-issued ID and a selfie holding that ID towards the end.
- Click "Continue" to review the information you've entered. If everything is correct, click "Submit Application."
- You should receive an ORUS email acknowledging receipt of your application. Once reviewed and approved, your TIN (nine digits) will be sent to your inbox within a few days.
5.) SSS Number or Proof of SSS Account (take a photo or camscanner app)
6.) 7-specimen signature form (print and sign then take a photo or camscanner app)
Get your 7-specimen form by following these options:
Watch AXA Video Guide
Download 7-Specimen Form
To-follow: Create/ Provide your Metrobank Account (We will provide you endorsement letter to open an account in the nearest metrobank branch)
Licensing Fees Breakdown
